Saturday, February 28, 2015

de-molding

I de-mold the outside molds, and the result was very nice, there were still some little errors on the edges. I filled them with some putty after I did cut away the excess putty of yesterday.
I also glued  the beam compression bars but I forgot to take pictures of it, so I place them tomorrow.

Friday, February 27, 2015

finished the holes from the inside

I closed the beam mount holes from the inside for front and back. In the morning I did cut all the carbon and prepared all the rest of the stuff. After the lunch I put all the carbon on it starting with the front and it took me till 19.30 before I was finished.


Thursday, February 26, 2015

filled the edges

I filled the edges with some of cuts so that I can laminate tomorrow the inside. I also cut and sanded the foam on the inside.

Wednesday, February 25, 2015

front side beam mount molds

Yesterday I made a mold but I was not satisfied with the result, so after a night sleeping I did find out how I best I could make it. Today I took a half day free and made both front molds. Tomorrow I also have half day free so I can fill the caps with some strips of the carbon that was cut out and some putty. The carbon bixial has to be cut to. If everything works out well the caps will be closed this weekend.

Monday, February 23, 2015

after side beam mount molds

I stopt a little bit early from work and I made the after side beam mount molds. They were easy the front will take a bit longer I think.

side beam mounts
Yesterdays work

Sunday, February 22, 2015

the after beam mount gaps

I did the same as yesterday to start with grinding the excess putty away and sand the different parts. Than I made the foam panels fit. This time it was more assy than yesterday because the top is open and it was more repeating the steps of yesterday. After the lunch I glue them in place. After the tea break we did the UD on the underside, this were the last pieces what had to be done. Al the UD stuff on the beam bulkheads are is done now. I did not shot a picture of it because I made already a tent to keep the boat warm and I then realised I did not take a picture.

after grinding and sanding
before grinding and sanding

Saturday, February 21, 2015

first step to close the front beam mount gaps

I started today to grind and sand the the putty edges away, they were left when the lower mold was taken away. I then made the foam plates fit, Rob did cut them a couple of weeks ago. There were only some small adjustments needed but this took some time to get it right. I filed the lower seams with some foam so that I did not need to fill them completely with putty

Friday, February 20, 2015

laminated the after beam bulkhead

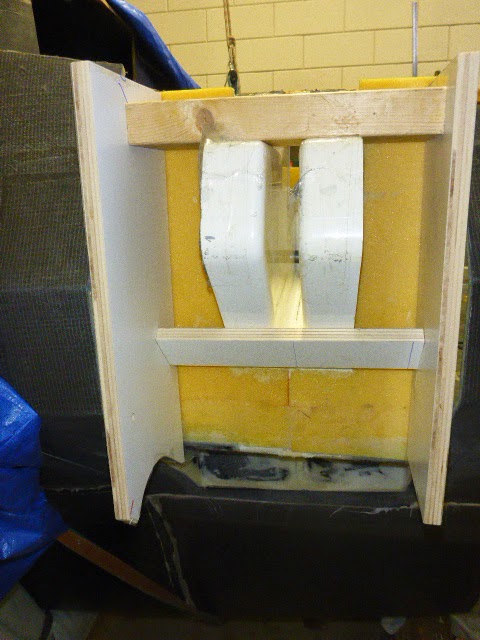
I started today with making a mold to extend the flange on the top of the after beam bulkhead. The cockpit seats will be glue later on it. In the afternoon I laminated both sides of the after beam bulkhead.

Tuesday, February 17, 2015

de-molding

Tonight I de-mold the after beam mounts outside and under the cockpit floor. For the last one I prepared the surface for the laminated under the deck.

Sunday, February 15, 2015

varios jobs

I started this morning to de-mold the after beam mount that I laminated yesterday to bridge the cap. I directly cleaned the putty edges so that it was ready to receive the under laminated. The next job was to laminated the other side so that that cap is now also filled. After the lunch we did the last side of the frond beam bulkhead, this is a big job because of the many layers that had to put on. We had some time left so we did the underside of the of the after beam mount what I cleaned this morning.

Saturday, February 14, 2015

making molds for the after beam mounts

I did spend three quarter of the day to make the four molds that bridge the cap from the beam mounts to the cockpit floor and with preparing for some laminating. I laminated only one side because it was already the end of the day when I started with laminating. Tomorrow I do the other side and the last front beam bulkhead.

Friday, February 13, 2015

some more UD on the aft beam mounts

We getting some guest for dinner so I stopped early this time. I only put some more carbon on the after beam mounts, the next step is then to make a mold to put some UD from the mounts to the cockpit floor.

Sunday, February 8, 2015

first UD on the after beam mounts

I started this morning with the necessary layers of UD and and biaxial on the after beam mounts and in the afternoon I did one side of the of the after side of the frond beam bulkhead. This time only one side because it was more than enough for today.


Saturday, February 7, 2015

Not so much progress

Today we are going south region of our club CTC to get some dinner and meet some friends so I did little. I only put some putty around the beam mounts, not to be seen in the pictures.


Friday, February 6, 2015

Fitting the after beam mounts

Rob and I fitted the after beam mounts and this went very well. When Rob did cut the foam to put around the beam mounts I was cutting the carbon pieces . Then Fetske did came with the Tea, after that Rob and Fetske did go away so I could do the epoxy putty and some temporary carbon pieces to make it strong enough to get the brace away tomorrow. The tent was already in place when I took the pictures, this is to get it warm enough.

Thursday, February 5, 2015

cutting the edges of the beam mounts

I first did cut the chainplates for Rob his boat and I then started to cut the edges of the beam mounts.
After that I grinded the rest and filled the remaining small holes.
The after beam mounts also had to get some extra UD so I did that to. The after side of the front beam bulkhead did get some putty on the beam mount edges.